Parameters pane
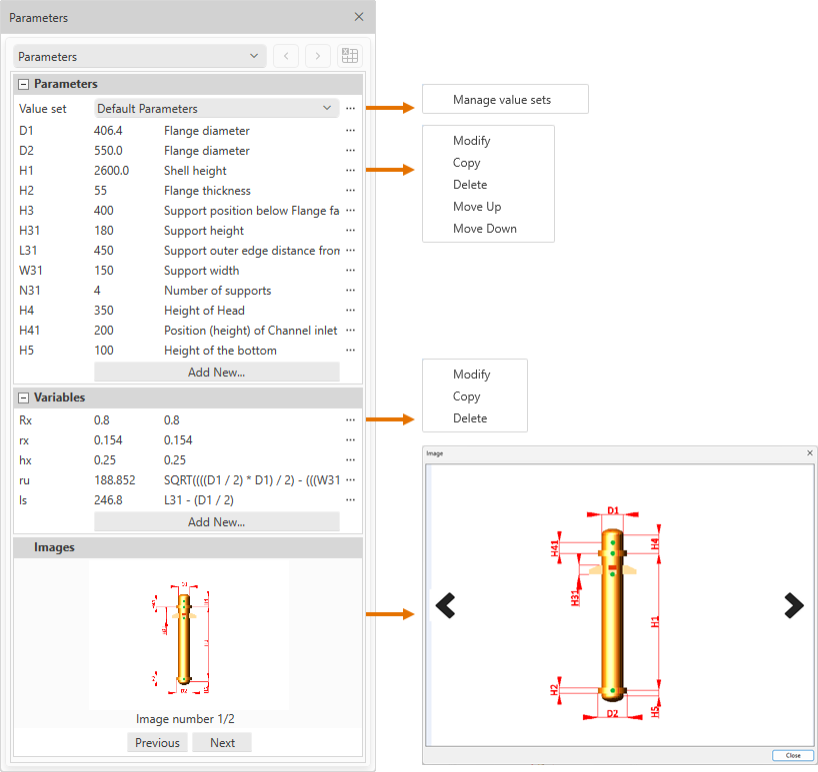
Select Home tab > Show group > Panes > Parameters Pane to show or hide the Parameters pane where you can manage the parameters, variables, and parametric images of the component model you are editing.
Parameters
In the Parameters pane, use the Parameters section to define parameters for the component model you are editing.
You can create multiple component models from a single parameterized component definition. While normal parameters rely on predefined expressions (for example, width, length, and height increase at fixed intervals), instance parameters are more flexible in that they allow the required values to be defined per component instance in Plant Modeller.
Creating a new parameter | Creating a new parameter by copying | Modifying a parameter | Deleting a parameter | Reordering parameters
Creating a new parameter
You can create new parameters.
Do the following:
-
In the Parameters section of the Parameters pane, click Add New.
-
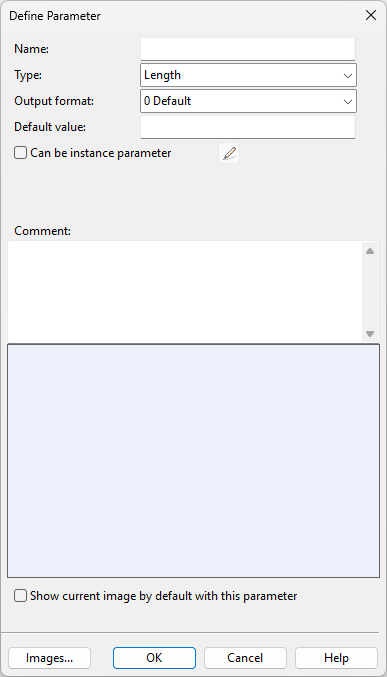
In the Define Parameter dialog, define the parameter's properties.
Setting
Description
Enter a name for the parameter. You will refer to the parameter by this name when parameterizing a primitive, point, or direction, for example.
Select the quantity type. See Quantity definitions and their units of measure.
Select how to format the parameter values.
Enter the default parameter value. This value is copied to each currently defined parametric model as the parameter value and used when the GDL object is visualized in an object browser dialog.
Select this option to create the parameter as an instance parameter.
Click the edit button
 to open the Edit Instance Parameter Constraints dialog where you can specify the values that an instance of this component model can have.
 Show/hide details

-
Range – Select this to specify a minimum and maximum value for the parameter, for example minimum "200", maximum "400". When adding the component to the model, the designer can choose any value within this range.

-
Allowed values – Select this to specify the allowed values of the parameter as a line-break separated list. You can also specify a unit of measure for each value. When adding the component to the model, the designer can choose one of the allowed values.

-
No constraints – Select this to allow any value that matches the parameter value type to be used when adding the component to the model.
Note: This setting can be overridden in the Dimension Table—either in the dimension attribute editor (an attribute-specific override) or in the dimension attribute value editor (a nominal size specific override). See Creating a dimension table.
Describe the purpose of the parameter. The comment is shown when referring to the parameter in dialogs, and internally it is embedded as a comment into the GDL object.
When the component model includes multiple images, select this option to use the currently displayed image as the default image.
This button opens the Manage Images dialog for adding image files to the component model. Add images that illustrate the functions of the parameters.
-
-
Click OK. The new parameter is added to the parameter list and displayed in italics to indicate that it is not yet in use.
Creating a new parameter by copying
You can create new parameters by copying an existing parameter.
Do the following:
-
In the Parameters section of the Parameters pane, locate the parameter to copy.
-
Click … and select Copy.
-
In the Define Parameter dialog, enter a name for the new parameter and edit the other values as required.
-
Click OK. The new parameter is added to the list and displayed in italics to indicate that it is not yet in use.
Modifying a parameter
You can modify existing parameters. Any object instances using the parameter will adopt the new property values.
Do the following:
-
In the Parameters section of the Parameters pane, locate the parameter to modify.
-
Click … and select Modify.
-
In the Define Parameter dialog, modify the property values as required.
-
Click OK.
Deleting a parameter
You can delete parameters that are no longer needed.
Do the following:
-
In the Parameters section of the Parameters pane, locate the parameter to delete.
-
Click … and select Delete.
-
You are prompted to confirm the action. Click Yes.
Reordering parameters
When evaluating a parametric component model, the parameters are executed in the order they are listed in the user interface. You can affect the execution order by moving parameters higher or lower in the list.
Do the following:
-
In the Parameters section of the Parameters pane, locate the parameter whose position you want to adjust.
-
Click … and select Move Up or Move Up to reposition the parameter.
Variables
In the Parameters pane, use the Variables section to add, copy, modify, and delete variables.
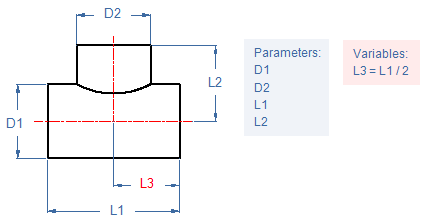
You can store frequently needed expressions in variables. For example, you may use a variable to store a numeric expression that multiple dimension definitions can use. If you modify the expression later, all dimensions that refer to the variable by its name start using the updated expression.
Variables that are not in use are displayed in italics.
Creating a new variable | Creating a new variable by copying | Modifying a variable | Deleting a variable
Creating a new variable
You can create new variables.
Do the following:
-
In the Variables section of the Parameters pane, click Add New.
-
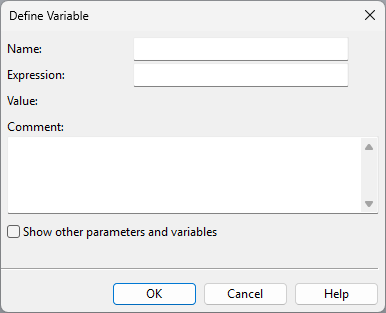
In the Define Variable dialog, define the variable's properties.
Setting
Description
Enter a name for the variable.
Enter the expression to use.
(Displays the current value of the expression.)
Describe the purpose of the variable.
Select this option to access all available variables, parameters, and functions and use them as reference information.
Select a variable from the list to display its current value and expression.
Select a parameter from the list to display its current value.
Select a function from the list to display its description.
-
Click OK. The new variable is added to the list and displayed in italics to indicate that it is not yet in use.
Creating a new variable by copying
You can create new variables by copying an existing variable.
Do the following:
-
In the Variables section of the Parameters pane, locate the variable to copy.
-
Click … and select Copy.
-
In the Define Variable dialog, enter a name for the new variable and edit the other values as required.
-
Click OK. The new variable is added to the list and displayed in italics to indicate that it is not yet in use.
Modifying a variable
You can modify the name and expression of existing variables.
Do the following:
-
In the Variables section of the Parameters pane, locate the variable to modify.
-
Click … and select Modify.
-
In the Define Variable dialog, edit the values as required, and click OK.
Deleting a variable
You can delete variables that are no longer needed and not in use in a parameter.
Do the following:
-
In the Variables section of the Parameters pane, locate the variable to delete.
-
Click … and select Delete.
-
You are prompted to confirm the action. Click Yes.
Images
In the Parameters pane, use the Images section to view images attached to the component model.
You can attach images in the Parametric images tool, and also in the Define Parameter dialog when creating or modifying a parameter.
When there are multiple images, you can click the arrow icons to navigate between them.
Clicking the current image opens it in full size in a separate window.
Instance parameters (instance parameters for piping)
Size of part (instance parameters for ducting)
Edit instance parameters (instance parameters for beams)